

Introduction
Webpack is a commonly used library among modern frontend-based applications. It is one of the popular javascript bundlers. It is now a decade-old and battle-tested library. Many full-fledged frontend frameworks like NextJS, and Gatsby use webpack for bundling and compilation purposes by default. If you ask someone what webpack is, they will answer that it is a JavaScript bundler. If you go a bit more in-depth and ask why we need a javascript bundler and how it works, only the curious might be able to answer satisfactorily. It isn’t anyone’s fault, modern frontend libraries are packaged so that you don’t need to worry about what happens under the hood. If we take the example of a ReactJS application configured through the create-react-app library, it takes care of the configuration of bundlers and transpilers. Developers can immediately start building the application through the knowledge of ReactJS. If one wants to master the art of building fast and performant front-end applications, one needs to have a clear mental model of the functioning of all these libraries. In this article, we will talk about why we need a javascript bundler in the first place and will explore how one of the most popular javascript bundlers, webpack, works under the hood.
Why do we need a javascript bundler?
JavaScript bundlers are tools that help in optimizing the delivery of JavaScript files in web applications. Following are the key benefits of using a bundler.
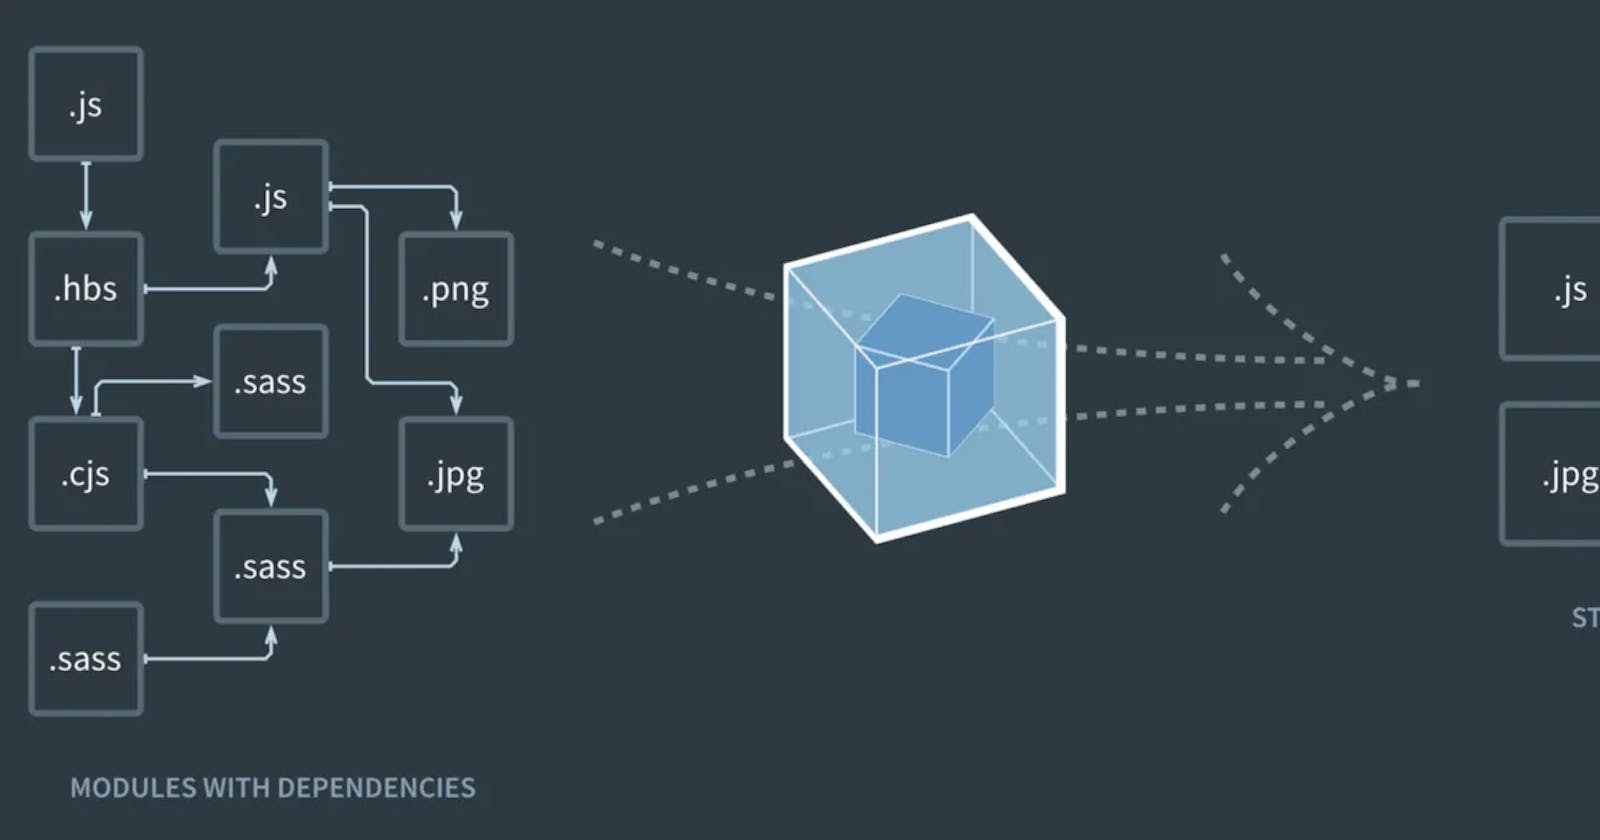
Merging, Splitting, and Post-processing on Modules: While working with vanilla javascript or any corresponding modern javascript framework, it’s better to split the code into multiple files for the development journey. The concept of javascript bundlers is a decade old now. A decade ago, for browsers to access a single file through HTTP1 protocol was a heavy operation. So it was better to combine all the code into one file and then make a single HTTP request. But most browsers have improved a lot since then and are now using the HTTP2 protocol for sending network requests that show no bottleneck over sending multiple requests to access files. Instead, we have started to first combine and then split the code base to load the minimum required resource on the requested route through bundlers. We have also started to remove the unused code(tree shaking), and blank/white spaces among the combined files to minimize the requested resources(minification).
Solving the problem of cyclic dependencies: Without bundlers, one needs to take care of the import order of the javascript files to avoid the “not defined” errors. Check out this file. Developers need to take care of the import order of script tags by themselves which is error-prone. Bundlers can traverse through all the required files and decide the loading order.
Anchoring transpilation and pre-processing on Modules: Nowadays, Javascript has added some modern rules to improve the development journey. But modern browsers do not support those features yet so one needs translators(which are generally called transpilers) to convert modern javascript into the javascript that the browser understands. Bundlers help in this process where it first takes the help of the transpiler modules to translate the files and then combine them for the browser to load directly.
Modern javascript bundlers can be imagined as compilers that convert all the development-friendly code into the optimized browser-readable format.
How does webpack work?
Webpack is an event-driven plugin-based compiler. That means, webpack has a life cycle for bundling the files and each life-cycle step can be imagined as an event. We can add a plugin that will listen to these different events and act accordingly. The default functionalities can also be inserted through plugins i.e. there will be some default plugins handling some core functionalities.
Let’s say the life cycle has these 5 methods:
compilation-start → resolve → parse → bundle → compilation-end
The plugins can be integrated to listen to these events and do the operation on the source code files. There will be some default plugins integrated to perform the core functionalities.
Any plugin-based architecture can be designed similarly, it has a life cycle for any particular feature, and custom event handlers(which can be imagined as plugins) can be added to act upon at different steps of the life cycle.
Let’s now go through the webpack life cycle.
What happens under the hood in webpack?
Let’s understand some keywords and then connect them to form a whole story.
Compiler: Just like a normal compiler, it will be starting and stopping points in the webpack life cycle. It can be imagined as a central dispatcher of events.
Compilation AKA The Dependency Graph: It is like the brain. Through this webpack understand which sources you are using in your code-base. It contains the dependency graph traversal algorithm. It is created by the compiler.
Resolver: It converts the partial path to the absolute path. This will be used to check if some file exists and if it does, give us some information.
Module Factory: Takes successfully resolved request by resolver and creates a module object with source files and some information received by the resolver.
Parser: Takes a module object and turns in AST(a tree representation of the source code) to parse. Find all
requiresandimportsand make a tree to parse for bundling.Templates: It is used for data binding for the dependency graph. It binds the tree object to the actual code in the module.
Now, let’s connect these dots.
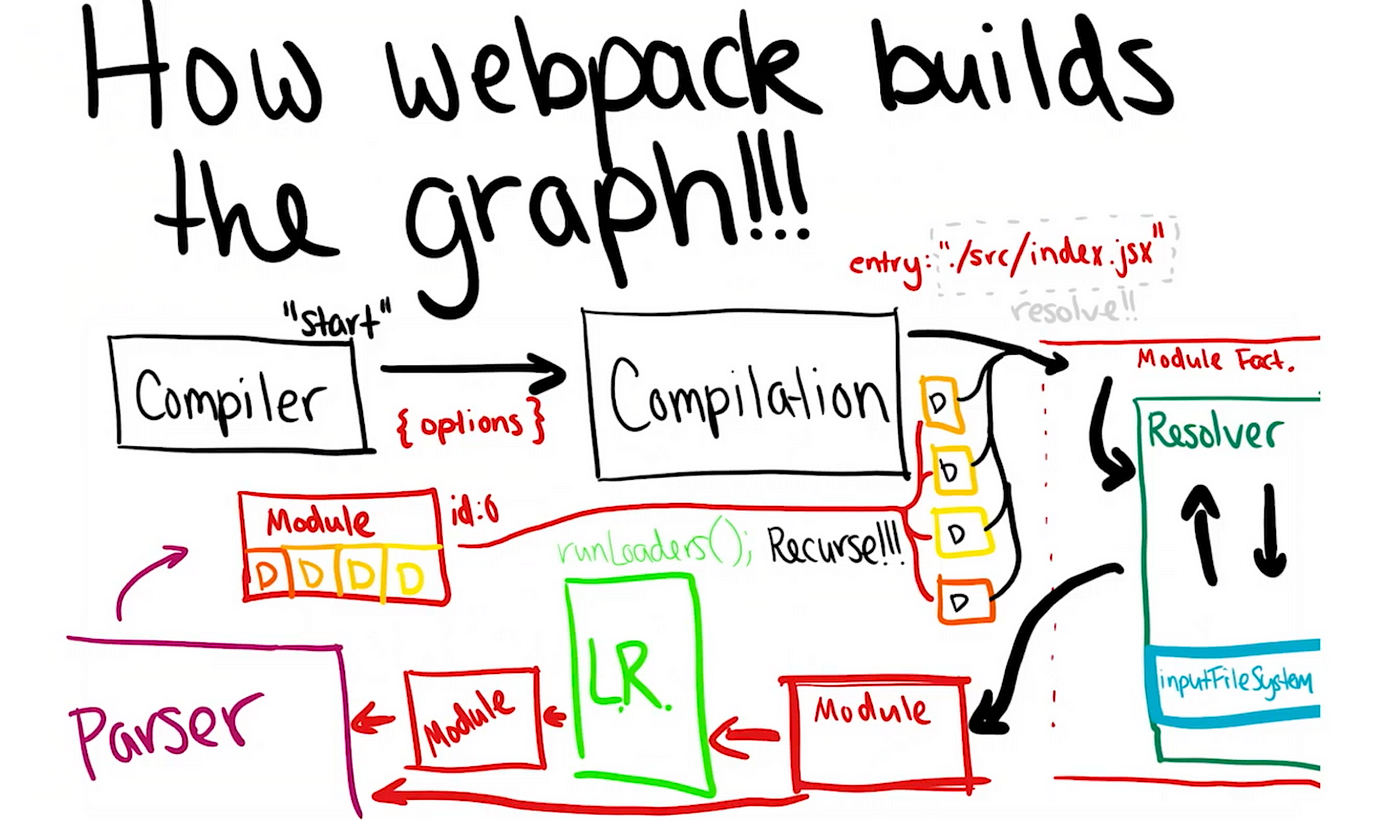
Source: Sean Larkin, co-author of the webpack. Image from his Opening Keynote at JS Kongress, Munich
First of all, webpack will look for the configuration file and look for the entry point mentioned. The compiler will start the compilation from that file. A relative file path will be sent to the resolver. The resolver will convert the relative path to the absolute path. That request will go to the module factory. Module factory will create a module object will some more information like the type of the file, size, absolute path, assigned id, etc.
Now, according to the file type mentioned in the module object, the compiler will look for the transpilers to convert the code into the browser-readable format. After converting the code, the parser will parse the file and look for the require or import statements, and update the object with the dependency information like below:
// example module object
{
  id: 0,
  absolutePath: '/path',
  fileType: '.jsx',
  dependency: [{ id1, relativePath }, { id2, relativePath }]
  // some more information
}
The compiler will parse all the files recursively in this manner to finally form a complete dependency graphof module objects. Hash-map will also be maintained between the file ID, absolute path, and parsed file.
After building the dependency graph, the compiler will topologically sort all dependencies.
Topological sorting: Topological sorting for Directed Acyclic Graph (DAG) is a linear ordering of vertices such that for every directed edge u v, vertex u comes before v in the ordering.
Then webpack merges all these topologically sorted dependencies with the help of a maintained hash-map to make a bundle file. Minification or Tree shaking can be done on these bundle files now as post-processing measures through an event listener which is also called a plugin. That’s it! Bundler has done his job in these simple steps :)
Let’s dry-run the above bundling process for the following code:
// cat.js ES Module
export default "cat";

// bar.js CommonJS
const cat = require("./cat");
const bar = "bar" + cat;
module.exports = bar;

// foo.js ES Module
import catString from './cat';
const fooString = catString + "foo";
export default fooString;

// index.js - entry point
import fooString from './foo';
import barString from './bar';
import './tree.jpeg';
console.log(fooString, barString);
index.js is an entry for the bundler. The compiler will start the process with this information. It will convert the relative path into the absolute path and make a module object. We don’t need any transpiler here as it is a simple javascript file. Now parser will start parsing the index.js file. It contains 3 import statements, so the final object module created for index.js will look like this.
// example module object for index.js
{
  "id":0,
  "absolutePath":"$home/index.js",
  "bundledFile": "bundledFile0.js",
  "fileType":".js",
  "dependency":[
    { "id": 1, "path": "./foo" },
    { "id": 2, "path": "./bar" },
    { "id": 3, "path": "./tree.jpeg"}
  ]
}
Webpack will now start compiling the dependencies of index.js. Webpack will recursively compile all the files until there is no dependency left for any file and form the following dependency graph. Here tree.jpeg will require a file loader/transpiler as NodeJS can’t understand it.
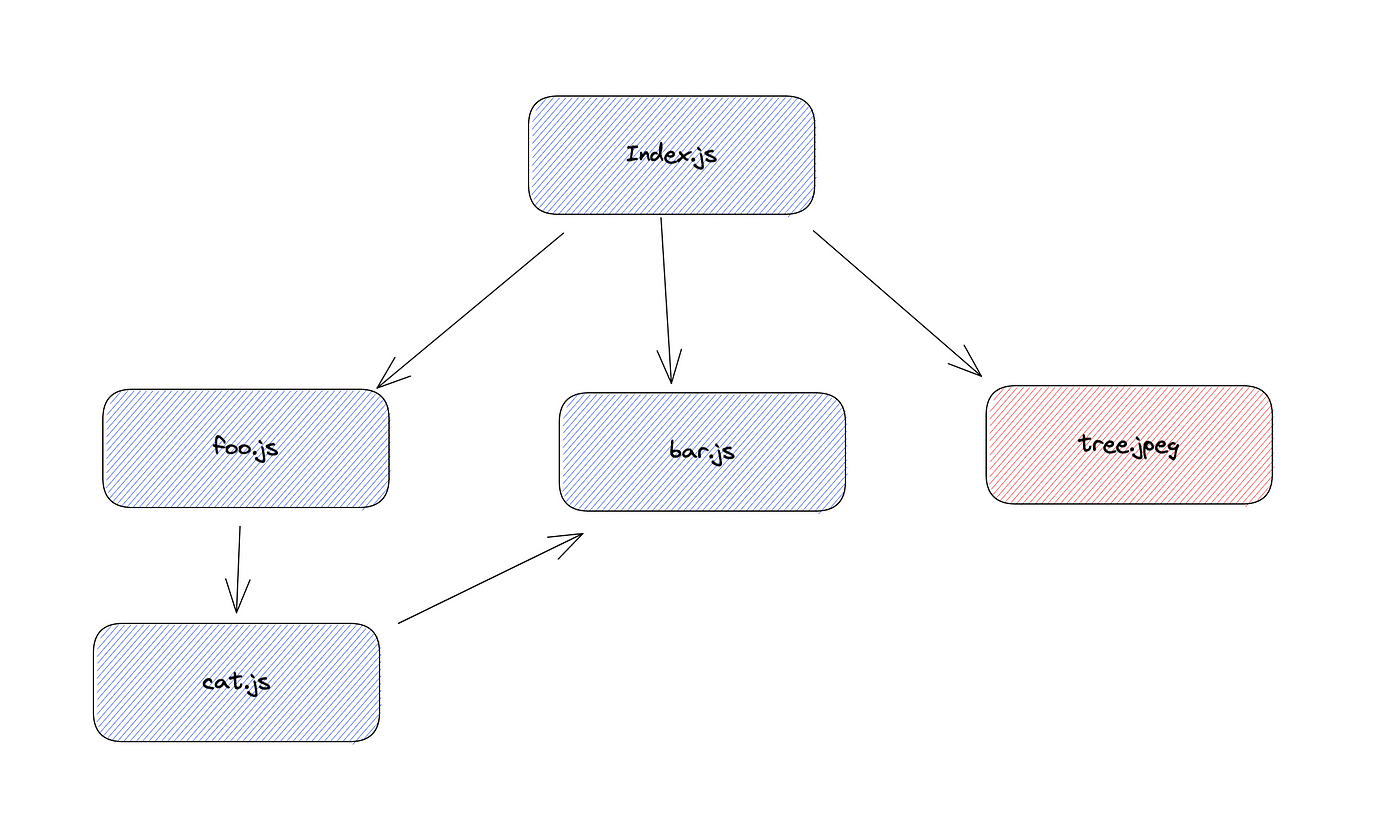
Dependency Graph
It will sort all the module objects in topological order and merge their converted chunks to form a bundle file for browsers to run directly.

Topologically sorted Dependency graph
Configuration options in webpack
These are the basic configuration options that webpack gives:
Entry: We all know webpack makes a dependency graph and the starting point of this graph is known as the entry or entry point. From the starting point of the dependency graph, it will follow all the dependencies to know what it has to bundle.
Output: Output tells webpack where to put the bundles that it had made and what will be its format.
Loaders: Loaders convert different types of files like images and CSS into a module before adding them to the dependency graph.
Plugins: Plugins provide functionality. It can provide much functionality like printing something on running the webpack, minifying, optimization of bundles, etc.
One can have a question. What’s the difference between loaders and plugins? Loaders work at the individual file level during or before the bundle is generated. Plugins work at the bundle or chunk level and usually work at the end of the bundle generation process.
Let’s look at the configuration file of the webpack to understand the above concepts.
// webpack config
const path = require("path");
const ExamplePlugin = require("./ExamplePlugin.js");
module.exports = {
  entry: "./src/index.js",
  output: {
    filename: "bundle.js",
    path: path.join(__dirname, "build"),
  },
  module: {
    rules: [
      {
        test: /\.js$/,
        use: "babel-loader"
      },
      {
        test: /\.css$/,
        use: [
          'style-loader',
          'css-loader',
        ]
      },
    ]
  },
  plugins: [
    new ExamplePlugin(),
  ]
}

// Example of a loader: DoTranspile.js
// You will see a majority of loaders being transpilers.

const doTranspile = require('do-transpile');
module.exports = function(devlopmentSourceCode) {
    const browserCode = doTranspile(devlopmentSourceCode);
    return browserCode;
}

// Example of a plugin.
// ExamplePlugin.js

class ExamplePlugin {
  apply(compiler) {
    compiler.plugin("afterCompile", (compiler, callback) => {
      console.log("Webpack is Running!!");
      callback();
    })
  }
}

module.exports = ExamplePlugin;
Webpack starts the compilation process from the file mentioned in the entry. Output bundles get built in the folder mentioned in the path value of the output config option with the name mentioned in the fileName value.
Loaders are generally used during the bundling process, mainly to convert or translate the file into a browser-readable format. Here we have added a babel-loader, styles-loader, and css-loader. The babel-loader helps in converting modern javascript files into the browser readable javascript modules. The styles loader helps in converting CSS frameworks like sass and less to normal CSS modules. The css-loader helps in converting modern CSS features into browser-readable CSS stylings. There are many such loaders available in package-manager. You can also write your loader like DoTranspile.js in the example.
Plugins are used to tweak the bundle at pre or post-processing stages, like for logging, modification, etc. There are many such plugins available in package-manager as well like SourceMapDevToolPlugin and IgnorePlugin. Check this to explore more. Webpack gives different event hooks to listen to. You can add your plugins to act upon bundles like ExamplePlugin.js.
What’s next for bundlers?
One major complaint with webpack is its performance time is relatively high which can be frustrating for the development journey as well as critically slow sometimes when deploying your app to the production environment.
Webpack is doing so many things in single-threaded javascript: compilation, resolving, creating module objects, parsing, and templating. These all are language-agnostic tasks. If we use another lower-level multi-threaded language to do all these tasks, building time can be improved exponentially. A few modern javascript bundlers are written with such languages as Turbopack(written in Rust) and ESBuild(written in GO) which claim to be faster than webpack.
Turbopack is an incremental bundler optimized for JavaScript and TypeScript, written in Rust by the creators of Webpack and Next.js at Vercel.
On large applications, Turbopack updates 700x faster than Webpack.
Webpack is a battle-tested javascript bundler but the performance time is still an issue that can be solved by using lower-level multi-threaded language. Let’s see where Webpack is heading!
References
Opening Keynote | Everything’s a plugin: Understanding webpack from the inside out | Sean Larkin
This article was originally published here by the author.